

How to write your first post in WordPress
Brilliant you’ve started your own site….
congratulations…..
Now you need to know how to write your first post in WordPress …..
This procedure covers any site working on WordPress not just on the WordPress platform.
Before you start
But hang on a minute ..
I know you are bursting at the seams to get all of what is in your head down and tons of people reading it, but there are a few things to think about before you start….
Site topic
Does your site have a topic it is going to be on…
You can make a blog about your lifestyle…but only if you are very interesting and others want to be like you …otherwise most are not interested…
So you need to make it all about your visitors…what you can do for them…
Getting into that right mindset before you start thinking about what you will write is always beneficial…
And talking about help have you selected your niche
Your Niche
Your niche doesn’t have to be too complicated but you must have a clear purpose…
Very few sites can get away with just creating posts about anything they want to…
Yes Google will index each post independently, but it also will rank your post with a view to how relevant your site is to the post…so random things will be more difficult to get higher in the SERPs
Talking of ranking in the Search Engine Results Page (SERP), we need to find something others are looking for and those are called keywords….
Finding Keywords
Each post will be a part of your site, so i tend to think of it as a node , a junction, with lines entering  and exiting to other external sites and internal pages…
This is what holds your site together and links you to the rest of the web.…bit like a spiders web…
And as i said above each post is about something others are looking for answers to…
So finding keywords that you can rank for in the search engines is crucial to your sites success…
Finding easy to rank for keywords is getting more difficult, but remember that new keywords are being searched for each day…
So there are always more opportunities…
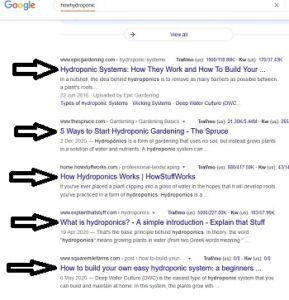
Looking for a keyword (or phrase) in Google
Using the auto complete function in the search box….
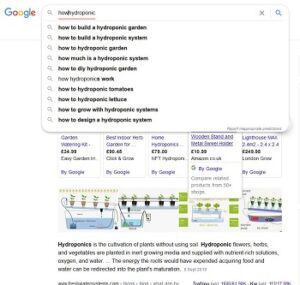
Where you start typing in a search and Google fills in the back end part…these are very useful in finding keywords that people really are searching for…
Remembering that the auto complete results go in order, so choosing one at the top is better…
Click on it and see who is ranking at the top…
Are they answering the query…
If not then there is an opportunity for you, if you can use the whole keyword in a few places and completely answer the problem.
Or look at the ‘people also ask’ and ‘related searches’ of other ideas.
Content strategy
Keeping an overall strategy for your content direction is a good idea…
It means you will be less likely to duplicate topics…
And you can link together parts of your site with internal links…
I know it would be nice to just start creating content, but this stage of planning is worth the time…
You can sort out the areas and start to see the whole site developing before your eyes ….
All you need to do is to login to your website dashboard and finish setting that up before creating your first post…
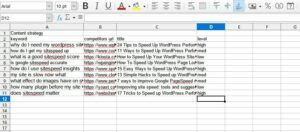
Create a spreadsheet with all of your posts in there, along with keywords and where they link to and from.
Setting up WordPress
So…ok…we have now calmed down a bit and thought about what we want to blog about and setup a sort of strategy we know where we are going…
Without this we are just drifting and that is not good….
Creating categories
Breaking your niche topic into more chunks will help with visitor navigation…
It also allows us to keep content generated on similar topics together.
This is carried out on a WordPress site by adding categories.
When you have logged into your dashboard down the left is a menu structure
And one of the items is posts.
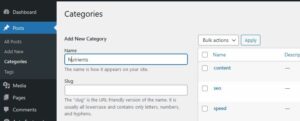
Clicking on this will show a few more items…and one of those is categories…
If you click on this you will find one default one called ‘uncategorized’
This is where most newbies have all their posts allocated.
So to appear more professional we are going to add some categories…
You only need 4 or 5…
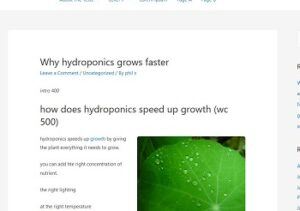
If you niche was say hydroponics, then you could have categories of …
- systems
- beginners
- reviews
- growing
- Indoors
All of these are entered in the categories box…don’t worry about the slug that will be filled in automatically.
I like to think of categories as the chapters of your site and will be listed in the menu….
Now you have a list of categories, you need to add some words that you will be using frequently…these are called tags and can be thought of as the index of your site.
Creating tags
Tags are created to link posts of a similar topic together…
Keeping with the example above of hydroponics
I can think of a few tags to start with…
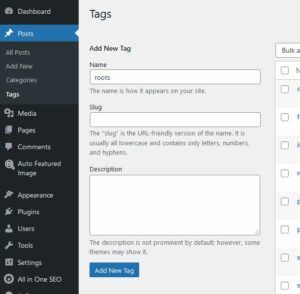
- nutrients
- clones
- post
- ph
- water
- propogation
- pests
- diseases
- breeding
And that was just off what i know ..
Now we can use a couple of sites to find some more…
Relatedwords.org will show you related words to your topic you enter…
And looking over the words, it appears we have added enough for a start
Other websites to explore are reversedictionary.org and describingwords.io
We are at the point where we have the keyword, created the categories and tags, and can start on the post…..
Adding a new post
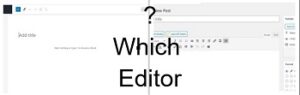
But before we do dive in completely, WordPress have thrown a slightly curved ball…
Before 2017 there was a simple WYSIWYG ( What You See Is What You Get) editor….
After 2017 WordPress introduced a new method of working that was easier for it to keep the bits of your site together…
Notice i said it….it may not be easier for you to create posts…but WordPress can keep things together easier…
At the moment you have two editors to use…
They are both entered the same way from your site dashboard
Click on posts
This will bring up the list of posts on your site.
At the top is an add new button…
Or in the sidebar is an add new
Click on this and you open the editor…
Note: if you want the classic editor and it hasn’t been installed, then adding the classic editor as a WordPress plugin is the way to go…
Click on plugins>>add new.
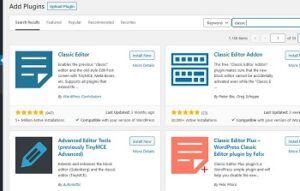
Type in classic editor into the search box.
Click on install for the classic editor.
And click activate….
You then go into settings>>writing and you can set your site to open the classic editor by default and allow users to choose between this and the block editor.
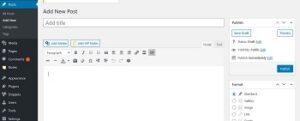
Classic editor
The classic editor support is now expected to end at the end of 2021…
So it is really worth starting out with the default WordPress editor the block editor…
I suspect there will be a lot of other plugins that take over from the official classic editor after this but as it is on its last legs then you are better off learning the block editor.
Just for posterity when you click add new and open the classic editor you have a menu at the top ( click the last menu item if you don’t see two rows of menu items)
With a large blank box for you to start typing in.
Add the title of your post ( the keyword and a few other words)
And off you go….
We will go through the formatting later on
And after you have finished click on save draft to save it as a draft…
You can now preview it to see what it will look like on your site.
This post is not live yet so others cannot see it.
To make it live then you want to change it from draft for it to be published as a blog page…
Now it is live for others to view.
But we will continue the rest of this article with the block editor….
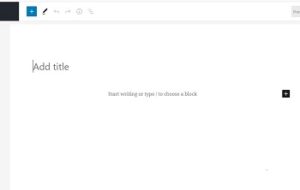
Block ( Gutenberg ) editor
The block editor is supposed to make creating a blog easier, for me the jury is out…
There are a lot more features in the block editor and the final aim is to make it so you can style the whole of your site from the block editor…
The components of the block editor are the same as the classic…
But are accessed in a completely different way…
When you open the block editor then you will see a large title, with a flashing cursor.
In here you enter the headline.
Headline
This is one of the most important parts of the post…
Unless you change the metadata ( we will come to that later), then this title is what’s shown in the SERPs….
The bit that people scanning for their answer must pick from all the other results, the words that talk to them and say ‘click me’
But you must also talk to the search engine about the topic you want to be ranked for…
So it is a balancing act between the two…
You tend to end up putting the keyword in the first part of your headline and if you have characters left then add something intriguing to tempt the visitors…
Try to keep your headline and site title under 60 characters, or Google will shorten it…
Outline the post
Now you know what your keyword is for the post, you chose that earlier….
So you now think of things you would like to know about the topic you are creating an article about…
You only need 4 or 5 main topics….
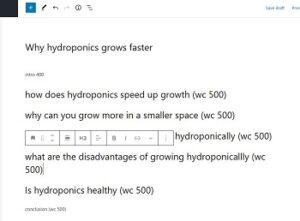
Write these down and you can set them as H2, or heading size 2….
After entering the title and pressing enter Worpdress starts a new paragraph for you…
If you enter the topics like this they will come out like normal text…
As you want them as headings you need to format them…
Click on the first line and then on the ‘p’ which appears in the popup menu….
Then choose heading…
And you have set it as a H2 heading…
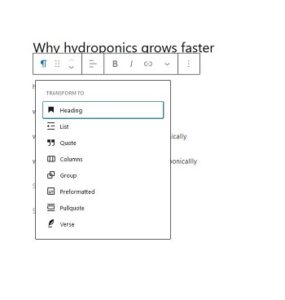

Click on the other headings you have come up with…
This techniques keeps your mind on topic and allows you to think about the smaller section within the topic, rather than having to jump back to the overall post topic and wonder whether you have added enough in that section…and whether it is in the right place…
Add content
So now you have sub titles, you can start fleshing the sections out…
You may have heard that one of the ways to create content is to listen to the voice in your head and imagine a person sitting next to you, the person you are helping with their problem…
And write like you are having a conversation with them…
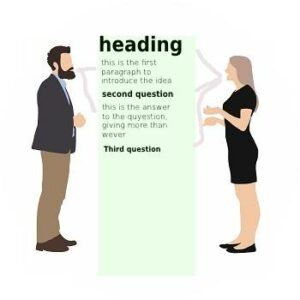
The sub headlines (subheads) being effectively their responses to you…
Only have about 300 words before you break it up with another heading…
This time it can be a H3 or heading size three.
Have a target word count in mind and allocate a certain number of words to each section …
You may even want to add this ( removing it in the editing stage later)
But add all the content for each of the headlines
If you don’t like the fact that a new paragraph is added every time you press enter then pressing shift + enter will add a newline to the existing paragraph…giving you narrower line spacing…
Scanning up and down your post you will find that it may appear a bit intimidating, starting you thinking ‘no one will read all that’ and you maybe right….
No one wants to read a wall of text.
So you can break it up with images and lists…
Add images
People remember things with images….
And your task writing a blog post is to help people with their problem.
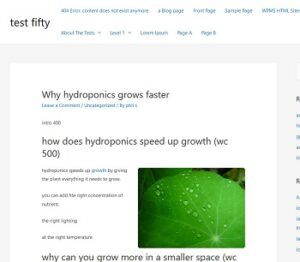
So to help them remember the major points you want to make, add a relevant image in the area of the post you want them to remember….
To add an image
- Click on the area of the post you want to add an image
- Click on the + at the top left of the editor and type in image
- You may get several choices, but pick an image for now
- Pressing enter places the image block
- At the bottom of the block are three selections for sources of images…
- Upload, media library or insert from url
I would advise adding all your images to your media library, the reason for this is if you add it from url and the image is removed, it gets removed from your post as well….doesn’t look good…
And you control the file size of the image as well.
There are plenty of free resources to find images and between them you should be able to find some images relevant to what you need…
Look online and see, after you have been scanning the stock photos, and see who is using them and how often they appear…so if there are several pages of images, don’t just pick the first page…jump to page 3 or 4 and select from there onwards…yours maybe different from all the rest…
And if you don’t want an image inline with the text …you want it to the right…
If you click on the image and select align
right in the menu (fourth from the left)
You can now click on the drag menu and drag it up next to the text you want to wrap around it…


Don’t forget to add the alt text (the right sidebar maybe closed when you start your post…Click on the gear icon at the top to open it…)
The alt text is used to describe the image for screen readers, Google also uses it to find out what the empty space is for,as it can’t see your images yet, so describe the image with a bias towards the topic
of the post.
As i said use the images wisely and make sure the file size is small before you upload it ( typ 50kb).
Use an image editor to get it down to size, approx 350 pixels in the X direction is normally ok for a post.
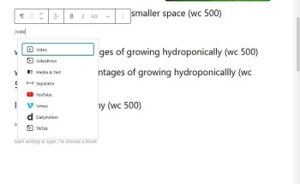
Adding a video is a similar process but typing in video to get a video block…
You can add the embed code from YouTube by click on the share button and then embed….
Other bits of interest are highlighting certain parts of the text that you feel are important…
People skim posts now to see whether it is worth reading.
Skimmers will pause to read anything that pops out, but don’t overuse it or they will just blank it off.
The other is lists….
Add lists
You have two list types to choose from…
Numbered lists where each line is incremented as you press return
- The first point
- The second point
- The third point
And so on….
Or unordered lists
- a point
- Another point
- Totally new point
And these are each blocks.
They can be added while you create the post or opportunities spotted when you review the post…
Where you talk about ‘ if you have this, that, the other and maybe something else’ you may be able to turn this into a short list.
Or where you have a list of parts needed to complete something…
Now you essentially have all the elements included in your post, but it is an orphan…
An orphan post is a post with no links out to anywhere, no signals to Google or your visitors that there is other relevant high quality content to add to this post anywhere on the web…..
So we had better change that…
Adding links
Your writing is unique, but your post content will be a rehash of other ideas brought together…
You can reference these ideas you thought were good by adding a link to them…
Another place to create links is where you have more information internally on your site….
And you may think that you create a link saying’ read more here’ …nooooo…….
There is Google power (link juice) in the text for the links, so don’t waste it…
Think of where you are sending the visitor if they click on the link and use appropriate text to link there….
So if you are linking back to an internal post on nutrients…you could say ‘ find out more about how to make your own nutrients in this article’ and create the link from ‘how to make your own nutrients’…
A tip is to not use the title of the post in a link..Google thinks this is spamming links…so try to come up with text that describes the topic you are linking to.
And where you place the links is important.
When you land on the post the visible part of the post is called the ‘above the fold’ part after the newspapers being folded with their headlines to try to tempt you to buy them….
So a good place to place the first and maybe a second link is in the above the fold part of the post….
Hopefully your logo, header and featured image are not so large that you cannot see any of the post….
This allows you to add a link or two in the first few lines…
I tend to link out to an authority site…Wikipedia or a university where the main topic is being discussed…first…
Then find a section that you have created more in depth content on, or note down that you need to create a post on a topic close to that, as an internal link….
Creating a text link :
- Highlight the text you want to make a link
- With the menu that comes up there is a chain like symbol…click on this
- And enter or paste the url of where you want the link to take your visitors.
- You have a choice of ticking the open in a new tab box or not….

highlight text 
click on chain symbol 
add the url 
press enter and link created
Some do some don’t, arguing the point that the visitor will click the back button if they visit the link there and then rather than reading and coming back….
So you have completed most of your first post now…
Adding images and possibly adding a list
You need to decide what you want the visitor to do now….
Call to action
The final bit of your post is the call to action…
This is where you get to tell the visitor what to do next …
And if you have crafted your post so that they are still reading, they will read and carry out your call to action…
These can be
- read this other article…
- Read this review
- Sign up for the newsletter
- Optin for a free book
Basically you want to ask the visitor to do something in return for gathering the free information you have taken the time to write….
And that just about completes your first post.
Finishing the draft
Wow, you have come a long way in your journey….
And have got your first post written and formatted.
Don’t get fooled into thinking what you see on your screen is what others will see your post like…
Depending on the screen width they will see it different from you…


So don’t get hung up on ‘ i want this image exactly here’ put it close to where you want it and that will be ok….
Now click the save draft button…
Review your post
Instead of just hitting the publish button it is worth just taking a bit of time out and reviewing your post…
Go back to what you started out creating and look at the headers ( click the i at the top to get a summary of the information on your post…the word count the headers and paragraph count)
Have you gone over or under the word count…don’t worry if it is up to 10% either way.. .but if it is a long way out try to see where you added more words or need more words and add them….have they added value to the post or are they just fillers…
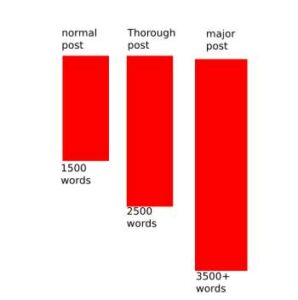
Good targets to aim for are :
- Simple posts 1500 words
- Thorough posts 2500
- Major posts 3500+
And think of simple posts as answering questions your niche have.
The thorough posts as more in depth topics they are interested in
And the major posts as areas of you niche where you are covering quite a bit of ground….
So after your coffee, time out go back and read it again …looking for typos ( if you have Grammerly then this is almost taken care of, but even that can make mistakes…)
And do me a favor…
Do this one last thing…
It may seem a bit odd but try it
Read it out loud..or get it read
Read you post as it is written….
Record it and play it back …

Or find a text to voice site and paste your article in there and get it read back to you…
Close your eyes and listen to it…
Try to feel the flow and see if anything sounds like it stalls…
If it does with you, it certainly will with your reader…
And unless you intended this, they could lose their thread or the hypnotic state you want them in to finish reading your article….
So go back and correct anything you feel is awkward.
Then ….
Final phase
Nope not the publish button yet…almost.
Now click on post in the right hand sidebar
And you get the options about the post…
You get to choose whether to publish it now or later
Who the shown author will be

And clicking on the permalink…
You want the structure to make sense…
Not ?93…
If that is at the end then click save draft at the top and the url slug may change…
You can shorten this from the full title to just a few words…
So instead of ‘how-to-setup-a-hydroponics-system-the-right-way’
You could change it to ‘setting-up-a-hydroponics-system’
Making sure there are no spaces in the url slug
Next comes the category…
Tick the one you want to assign this post to
And then tags…
Those single words that help find parts of the post you have just created.
If none exist you can add them, with a comma separating the words…
Then the featured image…this is the one shown in the blog roll and dependant on the theme right at the top of the post when you open it…
If you don’t want to add one there are plugins to take the first image in the post and add that as the featured image.
The excerpt is that little snippet that Google shows under the heading in the results page…
Google doesn’t have to take notice of what you type here, it can just take the first few words from your post…
And if you have a seo plugin installed you will probably see what will be displayed in the SERPs.
You can add a snippet that adds curiosity, but as i say don’t be surprised if Google chooses something else from your post.
You now have the choice after clicking on discussion whether to allow comments and pingbacks…
If you do allow comments then i would strongly advise against allowing pingbacks…
What are they….
When a comment is left wordpress tries to talk to the original site ( if left) and effectively adds a backlink from your site to that site…and some of the sites that leave comments are not good…so i would suggest unticking allow pingbacks….
And now…just when you have had enough you can….
Push the publish button
That’s it click that publish button…
You have gone through everything and must be as exhausted as me by now…..
What with writing the article, adding images, lists and links…
Reading it back and going through all that other stuff….
enough…..
The end is in site but there are a few tasks left to help your site…
If you just post and hope that visitors will come then you may end up disappointed….
I know you have selected a good keyword, written a very good engaging article…but…
Google may not take any notice of you for a few days..
And then you are just added to a list (indexed)
Until your site is approximately three months old Google doesn’t think you will cut the mustard…
So you must do the work to try to get visitors and show Google that your post is important and people want to read it.
You must do the marketing yourself, or get a VA(virtual assistant) to do it for you….
Promote it
Ideally you know where your niche hang out on the web…
Be it on forums, in Facebook groups, on twitter or other platforms…

If you don’t then it is worth spending a little time using Google to search for forums and specialized pages aimed at your niche or topics.
This way you can use these to your advantage to drive visitors to your site…if the platforms allow…
Set up your signature so it points back to your site…
And get involved with them…
Interact so they know you exist and find your answers helpful…
This way you may be able to find a question asked that you can reply with a ‘ i’ve just written a huge article about this on my blog’ and give a brief summary….
Letting people find your profile and website…
And if you are a new site then Google doesn’t know when to visit your site to look for new information yet so you will need to tell them to go visit….
Add it to your analytics
I am assuming you have a google analytics account and a search console account and have set them up….
Copy the link from the view post in the sidebar….
Open your search console account and make sure it is the right site at the top
Click on ‘url inspection’ in the left hand menu
And paste in the link which you copied.
Search console will determine whether it knows about your post…and if you have updated it then you can request indexing again here …or if it is the first time crawling then you request indexing here…
Google goes away and adds you to list list of things to do
And all you can do is to relax and wait…
Oh…and congratulations….especially if you got to this point and have carried out the tasks for your first post…
Or are just about to…
Welcome to the blogging world…

There are quite a number of steps and a lot to learn to creating your first post in WordPress.
Well to remind you i have created a summary which you can download and just to make sure you don’t forget anything….
All you need to do is to pop in your email address so i know where to send it and it’s yours….
If you have any questions or comments please leave them below and i will get back to you…
If you have any technical questions please feel free to use the technical help form and again i will get back to you…
Thanks for reading
phil


This is an awesome article. It’s been the most instructional article that I’ve read in a pretty long time. I might just come back to your website in the future for more instruction articles like these because I am very new at all this technology stuff and I could use a nice helpful article like this one to help me out every now and then
Hi Misael, Thanks for taking the time to visit the site and the kind words.
Please fell free to signup or bookmark the site to see when new content has been added.
Over the next few months i will be adding a lot more content on WordPress site speed, content strategy and SEO…
In fact there is a new article out about wordpress website planning, which maybe too late if you have already started your site, but worth a read…
I wish I would have found this years ago. I figured this out but it was all through trial and error. Mostly, error. But eventually I figured out how to make my wordpress site Dashboard Destinations the site I’d wanted from the beginning. If I’d found this right away it might not have taking me as long to know what I was doing.
Thanks for visiting and commenting…
Starting a website can be a lot of hit and miss…mostly miss until you get to mostly hits…
But most people don’t have the stamina to get there…
As you say this guide could shorten your online journey to success, but is no guarantee…
I am glad you have found how to get the site you wanted…
Amazing! Thank you so much for this information. I have favorited it because I will need to re-read everything and make sure my site is up to par. You are so intelligent to dissect every part of the the publishing process. I don’t think I’ve seen a site do that yet. Thank you again.
Thanks for dropping by and reading the article…
And thank you for your kind words…
It can be suprising how much there is to creating a post in wordpress, but broken down then you make sure that everything is covered for a good user experiencce as well as satisfying hte search engines…
I hope your posts rank well and are useful to your visitors…