sprucing up your posts with images in wordpress
How to insert images into a wordpress post
We all like to spruce up our blog posts with images…
Why add an image to a blog post: it breaks up the text, it adds to the idea and it keep people on your page longer. Images can reinforce the idea it is adjacent to as they are processed 60,000 times faster than text. And a caption can be the most commonly read words in the post.
So just a glance at an image and it’s caption is normally enough to associate the idea if closely related….Wordpress has changed its main editor a few years ago, but a lot of people are still using the older classic editor..
So in this guide we will cover adding images in both the classic and the block editors….
But first we will deal with getting images onto your site….
Adding images to the media library
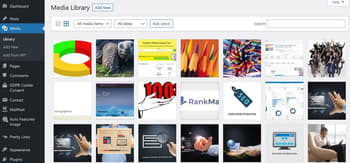
In your site dashboard if you click on media it brings up your library…
You see all the images and can click on them to look at the attachment details….
You can find out where it is used, the file size, the size in the post, the name of the file…
And you can edit the alt text, title, caption and description….
But this is for images already in your image library…
How about getting the images into there…
Uploading images to the image library
You cannot add them directly into the library page…which i have always found strange…
But if you click on Media>>add new a page opens that allows you to upload the images to your site…
You now have the option to drag and drop images or click the ‘select files’ button…
Or if you are in the middle of editing a post then you can drag and drop the images onto the post…this will add them to the image library and open it as if you have clicked add media….this is for the classic editor…
And if you drag and drop when editing in the block editor then it will add an image block where you see the blue line when you are over the post….it does add it to your media library…
Sources of images
When you place an image block in the block editor it gives you the options to upload, add from media library or add from url.
I am a little cautious about adding images from urls as i have seen some sites that have got blank placeholders where images or videos have been removed from the web….
So if you know where the file is from and they are from one of the linkable sources then by all means use it….
But you have no control over the size of the image or the speed impact this is going to have on your pagespeed…
Personally unless i really have to use this method all my images are held within my media library….
So that’s how and where you can add images now to go through in detail adding images in both the classic and block editor…
Adding images to your site in wordpress
Inserting with the classic editor
The classic editor is now a plugin and official support of this will be coming to an end at the end of 2021….
So i would advise anyone still working with this editor to seriously start looking at the block editor…
I am sure that there will be other editor plugins if the official one is dropped, but as with all plugins and especially third party ones you never know how long they will be supported….
The block editor is the main choice of wordpress now..
But we will go over the classic editor images for completeness…
Single image
When writing a post in the classic editor you have a menu at the top and a blank box to start with….
So you add your title, then start in the main text box…
Maybe outline the post with subheads
And even image placeholders once you are used to creating posts…
Going back over your post you want to get rid of the placeholders and add real images to your post….
You get to your placeholder and click on the add media button at the top of the editor…
A new popup appears showing you what is in your media library…
Now you click on the image you want to insert and a small tick appears in the top left corner.
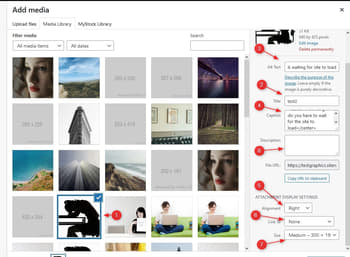
To the right there is a panel where you can see the information relating to the image…
The title (2) is supposed to be relevant to the post and images …but not in this case.. so i would retitle that at this stage….
Add the alt text (3) to describe the image and its relation to where it is in the post
Add a caption (4) and <center> caption</center> tags to place it central under the image….you have to style everything in wordpress….
Decide on the alignment (5) you want …i tend to have the images to the right with text wrapped around….
You can align…left, right, center and no alignment…i would advise not using the no alignment as this can cause problems with differing screen sizes….
You can link your image (6) to a url, media file, attachment page or none…
The size of the image within the post (7) note: this can be changed once you have loaded it…..
And posssibly a description (8)…this can be used when indexing images as well to add a link back to the original post and describe the post summary and relevance of the image….
So there is a little bit to do before you add an image to your post….
Once you click insert to post the image will appear where your cursor was.
From here you can still move the image..
If you click on it and drag the image upwards …what you are looking for is where the cursor is sitting …as you drop the image it will relocate to where the cursor was left….
And you can resize it ….
WordPress comes with a few sizes, and these can be changed by the theme developer….
If you click on the image you will see handles you can click and drag to resize it…
Then you can click on the pencil icon and see what size you made it …
Noting this down you can now drag the other images you place and set them to the same size manually…
And that is how you place an image in the classic editor….
Now if you want images side by side to show a sequence you are better off adding it as a gallery rather than trying to position them left, center and right….
Let’s see how to do that…
Inserting a gallery
Let’s say you have taken four photos for a sequence, and have uploaded them to your media library, and want them showing in a line….
The best way to do this is to add them as a gallery…..
To do this set the cursor to where you want to insert the gallery…
This will cut across the whole of your body container…
Click on add media as before…
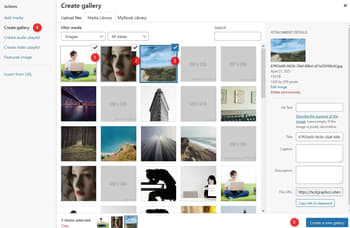
This time when the media library comes up…
Click on the first one and then hold down the ctrl key and click on the second, third and fourth.
You will see ticks on all of the ones you have selected and at the bottom it will show how many you have selected….
At the bottom you can edit selection…
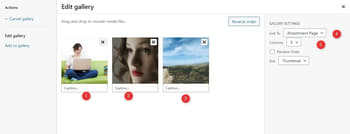
This takes you to a page where your selection is shown and you can rearrange them, add the alt text, caption and description before clicking create gallery to the upper left…
You now can click the create gallery in the lower right, and a new page opens where you can setup the styling of the gallery..
So set the number of columns to 4, size thumbnail and attachment page for the link…
What the attachment page does is, if you click on the image it opens full size so you can see it easier…
Can you imagine how small some of these images are on the mobile screens
Then clicking insert into post will place it into the post where the cursor was…
You can now drag it and all four images will stay in a gallery and move….
Clicking the pencil icon will allow you to edit the gallery.
And that’s how you add images and a gallery to the classic editor…
If you had uploaded a movie file to your media library then that could have been displayed instead of an image….
But now onto the more modern editor the block editor to see how that compares….
Inserting with the block
The new block editor was a shock to a lot who were used to the old classic editor…
As you can see from above it is almost a wysiwyg ( what you see is what you get) interface…
Being able to drag the images around easily…
Now the block editor was just that blocks stacked one on the other to build your post….
Not a problem if you are just looking at text paragraphs one after the other….
But now insert an image and place it to one side…
For a lot that is where the problems come in…
And still do…
Let’s have a look at how you can easily add an image to the right of text….
Single images
With the block editor you can create your own workflow, but two i know of are to :
- Create all of the text and then come back and add images or
- If you get an image in mind then you can drop an image block without adding the image to remind you that you wanted an image there…
Now you may work a completely different way and it would be nice to know how you work with the block editor to create your posts, let me know in the comments whether you like, dislike or just get on with it….
Anyway.. .back to adding a single image into the block editor…
You have written your text and now are ready to add the images…
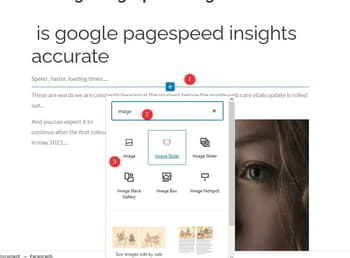
Where you want the image placed hove the mouse over the text above and you will get a + in the center …
Click on the + and you will be able to add a block….
If you type in image and select the image block and press enter…you get an image block added under the text…
If you click on media library then you get the same panel as above to enter the relevant information…
And click select…
You now have a small menu to allow you to add a caption and style it…
Pressing enter will show two handles to resize the image…
If you reduce the size to about half width of the container and then on the menu ( i have the menu in one place…at the top …to get this click on the three dots and then select the top toolbar…you know where the menu is going to be now) for alignment and select right..
The image will now allow the text to wrap around to the left and have a caption….
If you try doing the same with a media and text block…you do get the image to the left ( or right) but you lose the ability to have a caption…and you have to drag and drop all the text into the other panel rather than it being automatic….
The gallery is easier than in the classic editor …so let’s have a go at doing that now…
Inserting a gallery into the block editor
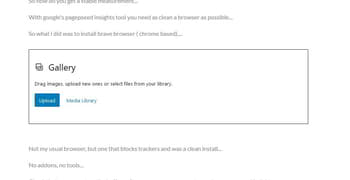
Carry out the same process to add a block as with the single image
Hove at the bottom of the text you want to add the block and click on the + in the middle….
When the block selector comes up, type in gallery and select the block….press enter to add the block.
Now you can select the images from your media library as with the classic editor
Once you have ctrl+click selected the images you want
In the right hand panel you can rearrange the order of the images…setup the number of columns ..if you have four images and set three columns the fourth image is large size at the bottom of the three…nice feature…
And you can add an overall caption for the gallery…
Moving the gallery to another position you use the move menu items ( the up and down arrows), this moves it up one block and down one block easily….
So there you have it adding images to the classic and block editor…
So besides adding interest what else do images add to your post….
What SEO you need for images
When adding images the search engines only see a link to a file…
They are getting better at ‘reading ‘ images and will in the future be able to recognize shapes and what the image actually contains overall.
But at the moment we need to help them ‘see’…
Which means it can be fooled…
Not a good thing, but the search engines relies on the alt text to help them with what the image is about…
You can use it to describe the image exactly for the screen readers ( which is what it was originally intended for) or you can describe what it is and what it means in relation to where it is added in the post …
Thus adding more SEO to your post….
The title of the file can be another indicator to the search engines that this image is helping this posts relevance and can be a keyword.
So images can help with your posts seo as well as helping the visitor ‘see ‘ the concept you are trying to get across…
But how large can the images go before they become a problem for speed of your site…
How images affect Blog speed
We now snap a huge amount of images from cameras and mobile phones. An amazing 1.4 trillion photos will be taken in 2021 according to focus.milo.com
But that is not the only source of images…
There are plenty of free and paid stock sites online…
Along with manufacturers imagery…
And they all want to be high quality when displayed on your site…
But the quality comes at a price if file size…
And mobile download speeds are not the same as desktop…so there is a bottleneck there…
And google has picked up on this…
Adding a ranking factor for sitespeed or core web vitals which includes the largest contentful paint….
And this means the size of your images must be small to comply…
So what do i mean by being small…
Where are they added to your site
Look at where your images are added to your site…
Most of them are 1/3 width of the container, some are full width, some headers….
So ok let’s take the 1/3 width as a start….
Whats the actual size of the container on your screen…
My display …quite an old one is set to 1280×1024 pixels….
Checking with chrome the container is 856 pixels wide…
Meaning the image would be approx 300 pixels wide….
So lets say we set the image to 350 pixel wide at a resolution of 72 dpi…
Off of a free image site i downloaded an image which was 9mb in size …
The image dimensions were 5120 X 3413, 300 dpi.…you could probably print that as a poster without pixelating…
So this need to be reduced…
How do i do this
In windows there is a little program most of us dismiss called paint.
Openinig the image within this program and then clicking on the resize menu item and setting it to pixels
Typing in 640 and then seeing on screen
Clicking file>>save as >>jpg
And giving it a sensible title aligned with your post…
You will find that it has come right down in size….
It is now 85kb or 0.085mb from 8.3mb…
The other program i have come across recently is a little free utility called RIOT
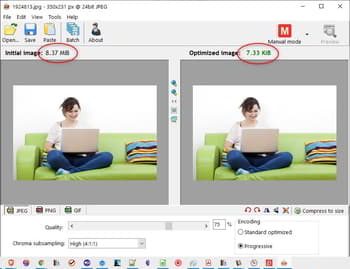
( Radical Image Optimization Tool)
And this can compress it even further….
Dragging and dropping the image into the panel you get asked if you want to resize it as it is a large image …
You click yes
And type in 640 pixels…
The image to the right is the one you will be saving and that is 27kb…
A massive 307 times smaller….
Ok when you upload it to wordpress in the large state it will be restricted down to 2500 pixels anyway…but even so you have now transformed your image to a very small file size, very easy for mobiles to download and it means you can have more images in your post to cement your ideas into your readers minds….
Is it worth the little time it takes to do this, when your images will be on the web 24/7/365…
Personally i think so….
What do you think …
Are you going to be doing this extra step with your images …
Let me know in the comments below…
This post has been about how to add images to your wordpress post whether you are using the classic editor or the block editor…
How to position them to add value to your posts for your visitors….
How to add SEO value to your post through your images
And how to resize you images to prevent any problems with the newer google update through the core web vitals….
If you have any other ways you manipulate your images let me know in the comments below
Or have any questions on the techniques…
Thanks for reading
phil